Augmented in Action

Here are the images of my augmented in action however I cant get them to sit up right.. It is just a small change but I cant get it right at this time and before my hand In. I didn’t get my poster in showing my augmented in action but I have it done and this is it. I hope this can still count as it is a major part. I am also going to fix the way they sit and add the other three.

These are just the photos I am going to put up in detail how I did it.

The Three Augmented Buildings


There is a missing texture on the platform but I am going to fix this for next week. I know it means I may have to texture these again but will see what happens. I really liked how they turned out. They are small, cute and colourfull. They may need more detail on the texture or the building but I think they turned out great. I didn’t have any difficulty with the augmented apart from the rotation of the models but I think I have them right and there facing the right direction. I have kept them small as I don’t want them to over take the map illustration. The models are brighter then they are in these photos.

I would love to work on these more in detail before the show to get the models perfect and to add some animation to the models. I think It would look good but As they are just buildings I didn’t want them to do much as I didn’t have the time to create animations.

Blog.. Augmented Buildings

Time to show the final product. Unfortunately I never got my Augmented buildings handed in with my work due to really annoying and bad printing today. So gutted and have been busy doing my work that there’s nothing recent on my blog. I  am going to put up all my AR work on my blog now and hope it will be ok, as it might not be clear on my map that I have it done. I also didn’t get to augment all 6 of my buildings just the three but will have all six for my viva on Wednesday.

Sketches?

These have been handed in. But I never had the time to get some of them finalised on A3 they are in the small A4 book after each building section. I didn’t get the colour photos of them, to put on my blog but I have the digital sketches and will colour them in again for my blog.

The Augmented Sketches

Coloured Augmented Sketches


Creating the Augmented Heritage Tower

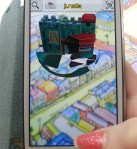
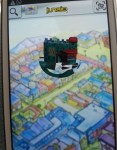
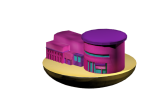
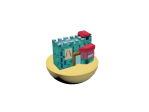
Once I had my models created and had them in the poly count between 1000 – 2000 I had to decide if I was going to have a animation or static building. I had previously thought of once the person taps the building a small animation would play, building moving, text or flag appearing displaying the name of the building. How ever I didn’t know how these work as I had seen a previous AR test that my supervisor did were there is a drop down with the text appearing.  However due to the time I had I had spent a lot of time on creating my actual illustrated Map. This didn’t leave me with much time for my buildings to create animations so I decide to have a static image of the buildings. Hopefully I can add a small animation once they are all done and I am happy with them.

OBJ File

Once I had created my buildings I exported them as “obj” changed:

  • faces to triangles in the drop down menu
  • Pre sets to None
  • Unpick YZ-axis

Done. This created two files of my buildings an “OBJ” and a “MTL” I will only need the obj file but I still have to  keep the mtl file with it at all times. Saved as HeritageTower. This created the “Model” file for my buldings

Adding Shadows and Baking Textures

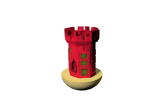
I had to remind myself how I created my previous practices. So starting with junaio I logged in as a developer to see my original channels. As I was only creating static AR ( obj ) I didn’t have to use Qtip but I still had it just in case. I first process was that I had to bake my textures. As AR doesn’t have lightening I had to create lights and shadows to my building to bake. I added two Spot lights to get a good lighting scene and create shadows.  one of the lights were 1.0 and white and the other 0.6 and pale blue. This would create a more softer colour and not so white. Selecting my whole model except the light, went to my render option and render to texture.

I chose were I wanted to send my file and then choose the complete map in the “output” section and changed the size to 512 x 512. Choosing existing channel and finally rendering out. This showed me what my texture, diffuse building would look like in my AR. If I didn’t like it here then I would have to change the lighting.

Heritage Tower Diffuse Map

I then opened this in Photoshop and saved it as PNG. This created my “Texture” for the Model.

Marker

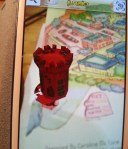
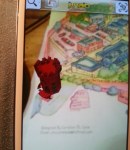
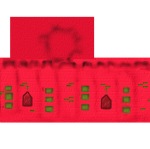
The next stage was the marker. I took a photo of the building on my map and used this as the marker. I didn’t want to add a certain image as I thought this would disrupt the final map so using the images of the buildings as the marker made a lot of sense. As children can easily point the phone to the buildings and the AR would appear.

This is the marker for the Heritage Tower:

To create my markers I had to take my photos and put them to 250 x 250 pix size in Photoshop at 300dpi and save as PNG file. Using Junaio pre tracker file upload ( http://dev.junaio.com/tools/trackingxmlcreator ) , I uploaded my marker and downloaded the zip file which contains my marker. This created the “Tracker” for my Augmented building.

Coding File

This file is a HTML file, that contains the programming side of Augmented that combines all my files together to create my augmented reality. I had to download this file from the Junaio website “Getting_started_in_Junaio” inside it contains the “index.php” which is the html file and a code. I copied this file into a folder I have created for the Heritage Tower which contains all my other files.

Coffee cup – Adding all my files together 

This is like baking of a cake. Adding all my stuff together. I have had to use a file host to do this. Mine is “CoffeeCup”  my Supervisor was able to give me space on a host called designatmagee, this allowed me to have a base area on the internet that Junaio can access my files and make them work in real time. I was giving a username and password to log into. This was my AR server.

Here is a screenshot of my files. I had to create a file on my AR server called “HeritageTower” I have specifically left out any spaces as you will find out later. I then dragged my :

  • index.php and code thing that was in the same folder ( ATT55463.htaccess )
  • HeritageTower.obj (My Model)
  • HeritageTower.mtl
  • Tracking.zip ( My marker file)
  • Dissfuse.png (My Texture)

Coding

This was meant to be the hardest part of Augmented Reality but I quit liked this section. It was adding all your files into the coding sections so that Junaio will create my AR. If my AR didn’t work this is were it would have went wrong. This is the most important part of the augmented reality. There are 3 files that I have to add. Each has its own location and it has to be typed EXACTLY like it appears in my AR server File ( HeritageTower) and no SPACES. This is why I have no spaces in my folder name that I created earlier. This is were the Index file works.

First I had open the index.php file as it was a HTML file I used Dreamweaver to open it. Once in Dreamweaver I set up a managed files section were it is automatically shows my files from my AR server file. You can see it below to the right:


Once I had my files set up in Dreamweaver I had to include them into the coding ( index.php ). There is a specific place were I have to include my texture, model and tracker. in “http://dev.junaio.com/publisherDownload/tutorial/”. This means in the  first section I have to say were my files are coming from (website, your server)/ the AR server (Caroline)/Were to locate the files (HeritageTower)/ The file (model,texture,tracker).

As you can see below is a screenshot of my index file for the Heritage Tower. Including the right files in the right place in Dreamweaver.

Tracker File

Were is states <results trackingurl=\”http://dev.junaio.com/publisherDownload/tutorial/tracking_tutorial.zip\”>

I put in my Tacking file : http://www.yourserver.com/caroline/HeritageTower/tracking.zip.

This points to my tracker file in my coffee cup folder.

Model File

Were is states <![CDATA[http://dev.junaio.com/publisherDownload/tutorial/metaioman.md2]]></model>

I put in my Model file that I created in 3D Max: http://www.youtserver.com/caroline/HeritageTower/HeritageTower.obj

This points to my model file in my coffe cup folder.

Texture File

Were is states <![CDATA[http://dev.junaio.com/publisherDownload/tutorial/metaioman.png]]></texture>

I put in my Texture file : http://ww.yourserver.com/caroline/HeritageTower/dissfuse.png

This points to my texture file.

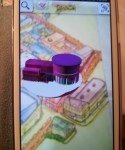
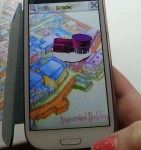
At the bottom of the index file there is a transition, rotation and scale. This is were it sits in the augmented reality, what way is it seen and the size.


Augmented Buildings Models

I only got time to create three of the six buildings but I will be creating the rest for Wednesday, Vivas. I am quite happy with the way they turned out as they are cute and correspond to the colour of my buildings on the map and Genevieve’s paper character buildings.

For my Buildings I have to remember that:

  • Poly count between 1000 – 2000
  • No shadows
  • Have to bake Lighting
  • obj Static AR
  • MD2 Animated AR

Final Augmented Buildings

Tower Museum

This is the checker unwrap to see how my texture will look once I apply my own texture.

Unwrap Texture

Here are the unwrap experiments I did for the tower museum. There is 3 different types all the same keeping the brick illustrations I did in my sketches and for my final designs. In the textures the  texture layer on the main buildings have different brick textures.

Unwrap to Model

Here are the unwraps on the model.  I didn’t know what type of texture to apply, paper, or bricks. I have finalised on brick texture.

My Final Tower Museum Model

Heritage Tower

Here is the unwrap for the Heritage Tower. I have kept it red as it is red in my map and Genevieve’s Heritage Tower character is also red. There is green bricks and a brick texture filter. To create a more textured buildings and fun and eye catching. It also has the brick textures so that it is the same as the other buildings.

Unwrap for Ground 

This is the same used in all the Models. I wanted the buildings to sit on a small platform rather then nothing as the illustrated map would be seen below the AR. This would take away from the model as you would be distracted, this is why I have created this small platform under each building.

Final Heritage Tower Model

Millennium Form

This is the third building I created. Pink and purple colour scheme. Square shaped and small like the previous buildings. I have also included the  ground platform. Below is the unwrap for the millennium form. There is slight brick textures included but for the main round circular building I added a sandstone texture.

Unwrap to Model

I think I may need to add more texture details to the buildings but that depends on the time I have left.

Hand Drawn Type

I was advised by my supervisor to create hand drawn type on my map for the title and a section of information on each building. I love that it is hand drawn because it has a more personal touch to it and in my opinion there is a more illustrated touch to  it. This is why I want to do hand drawn type and to have the title simple but lovely and the information too. I want to have the type light and just in black pen no colours as there is enough colours in the map and then the type will be overseen. I also want it to look slightly vintage and clean.

Here are some typography images I found that I found inspiring:

Some of my own sketches of typography:

The title would be “Walled City Map”


Blogging

Aw its been ages since I have been blogging and I used to do it everyday. Iv just been so busy working and doing practical work and sketches that my blog has been a last thought. I have been doing sketches and illustrator. It been a very stressful few weeks but also productive at times I think. I have to now upload everything Iv done to sort my head out, because once I can do that then I can get back on track on blogging and doing the practical work.

Visual Diary

Here are some images of my visual diary, I know I should have had images of this up ages ago. But have been busy. This has been a major help to me and I loved creating it. Anything that inspires me, I like or has something to do with my major project I have included into my book and added some notes and sketches. I helps me to write my blog as I put my images in it first and then it helps me to know what to post. It really is like a diary, when have thought I write about it in my visual diary and add the images so I am personally writing and referencing to the image. I do allot of that on my blog, properly more in depth but I would love to have my diary full of images, writing and sketches. I have included allot more pages since these photos were taking but I don’t think I will have time to post images as it is like a after thought.

Roofs

The other main part that I have to look at is the roofs. The map shows a great amount of roofs and in my coloured design I have left out the colour of the roofs as I think if they are coloured wrong it can mess up the map. I am still not confident on what colour to colour the roofs or what texture to use. But my first step was looking at previous  done rooftops, here are my findings, they are mainly buildings from city ville and looking at the texture and colour on the roofs. I love the colour and texture used on these roofs and would love if my roofs would look even slightly as professionally.

Here are some images of roof top textures as well. I could also use these as texture filters and also colour references. However like the windows I many not go into this much detail with my building roof tops as there are loads and too much of this might look too messy. But I will defiantly try.

Here are some of my sketches of roofs:

Windows

So this is one of the main areas I have to look at fr my buildings there are loads of windows on my map and I’m not sure if I am going to do much detail on the windows as they are very small and it might be too busy looking. But to be sure I researched some windows anyway and found a collection of really lovely illustrated windows done for new York  There is a lot of shading done on these but they are also very simplistic. If I was to do more detail in the windows even in the photo shop file I would possibly do my windows like this. Depending on time as well though.

The colours are lovely and they each are individually designed beautifully. This is something I would love my buildings to look like but only if it wouldn’t make my map to messy. The windows are very small on my map and I may have to avoid doing this detail all together but for researching and design thoughts I had to do this. I have also included a image of a full glass building that was taken from city ville I included this as there are some glass areas to my map, e.g. over the door of the Richmond centre and this would help with colouring.

Here are some sketches of my own of windows, the first image of simple windows with not much frames work and the second is greatly inspired by the research windows.